TM 5-3895-382-24
5.
Fill the engine oil pan to the correct level that is
indicated on the engine oil level gauge.
NOTE:
Refer to the Operation and Maintenance Manual
for the correct procedure.
Cylinder Liner - Remove
SMCS Code: 1216-011
Removal Procedure
Table 32
Required Tools
Part
Tool
Number
Part Description
Qty
1A-1460
Bolt
3
2J-3507
Full Nut
1
5F-7347
Head
1
5H-1504
Hard Washer
1
5P-8245
Washer
1
6V-2183
Screw
1
8H-0684
Ratchet Wrench
1
9U-6234
Puller Plate
1
A
9U-6281
Leg
1
Start By:
a.
Remove the cylinder head. Refer to Disassembly and
Assembly, "Cylinder Head - Remove".
b.
Remove the pistons and connecting rods. Refer to
Disassembly and Assembly, "Pistons and Connecting
Rods - Remove".
c.
Remove the piston cooling jets. Refer to Disassembly
and Assembly, "Piston Cooling Jets - Remove".
NOTICE
Keep all parts clean from contaminants.
Contaminants may cause rapid wear and shortened
component life.
NOTE:
Before you proceed with the removal of the
cylinder liner, check the cylinder liners for wear or
for damage. Check the inner diameter of each
cylinder liner at the top, the middle, and the
bottom. Check the inner diameter at two places
that are 180 degrees away from each other. The
maximum wear for the cylinder liners is 0.25 mm
(.010 inch).
NOTE:
An engine may have a high rate of oil
consumption if the surface of the cylinder liners
are glazed. Glaze can be removed from the
cylinder liners by honing the bore of the cylinder
liner.
1.
Rotate the crankshaft in order to gain access to the
cylinder liner. Place a protective cover on the
crankshaft in order to prevent damage.
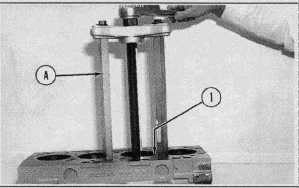
Illustration 184
2.
Install Tool (A) that is shown above.
3.
Remove cylinder liner (1).
7-72