TM 5-3895-382-24
Piston Cooling Jets - Remove and Install
SMCS Code: 1331-010
Removal Procedure
Start By:
a.
Remove the engine oil pan. Refer to Disassembly
and Assembly, "Engine Oil Pan - Remove and Install".
NOTICE
Keep all parts clean from contaminants.
Contaminants may cause rapid wear and shortened
component life.
NOTICE
Care must be taken to ensure that fluids are contained
during performance of inspection, maintenance, testing,
adjusting and repair of the product. Be prepared to collect
the fluid with suitable containers before opening any
compartment or disassembling any component containing
fluids.
Refer to Special Publication, NENG2500, "Caterpillar Tools
and Shop Products Guide" for tools and supplies suitable
to collect and contain fluids on Caterpillar products.
Dispose of all fluids according to local regulations and
mandates.
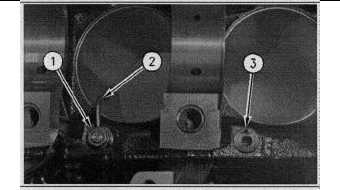
Illustration 187
1.
Remove four nuts (1).
2.
Remove four piston cooling jets (2).
NOTE:
The engine crankshaft may be rotated in order to
access all of the piston cooling jets.
NOTE:
Check that the ball moves freely against the
pressure of the valve of the piston cooling jet and
check that the tube of the piston cooling jet is not
damaged.
3.
Ensure that you know that a hollow dowel (3) is used to
locate the piston cooling jet.
Installation Procedure
NOTICE
Keep all parts clean from contaminants.
Contaminants may cause rapid wear and shortened
component life.
Illustration 188
1.
Install four piston cooling jets (2).
NOTE:
Ensure that piston cooling jet (2) is properly
located on hollow dowel (3).
2.
Install four nuts (1). Tighten the nuts to a torque of 27
Nm (20 lb-ft).
End By:
a.
Install the engine oil pan. Refer to Disassembly and
Assembly, "Engine Oil Pan - Remove and Install".
7-74


