TM 5-3895-383-24
19.
Put the rotating group in a vise as shown. Allow
clearance for the housing when it is installed on the
rotating group.
20.
Angle the cylinder barrel to one side.
NOTICE
Do not force the housing onto the rotating group or
damage to the vibratory motor may result. The assembly
should be done in one smooth, easy movement. If the
housing does not fit over the rotating group easily, the
problem should be found and corrected before continuing
the assembly procedure.
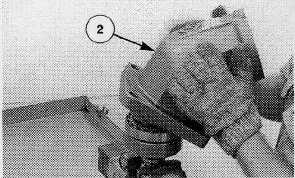
21.
Heat housing (2) evenly to a temperature of 80C
(176F). Put the housing in position over the rotating
group. Move housing (2) down over the rotating group,
and tilt it to clear the rotating group as it is assembled.
Continue until the rotating group bottoms out in the
housing. A small amount of tapping on the outside of
the housing may be necessary, but do not force the
assembly together. Allow the housing to cool before
continuing the assembly procedure.
22.
If removed install a new lip-type seal (7) in front cover
(10).
23.
Position shim (6) in the housing. Put clean 5P-0960
Multipurpose Grease on O-ring seal (9), and position the
O-ring seal on the shim.
24.
Put Tool (C) over the shaft. Put clean oil on the lip-type
seal, and install front cover (10) in the housing.
25.
Install retaining ring (11) in the housing.
26.
Install O-ring seal (3) in housing (2).
27.
Install dowel pin (13) in rear cover plate (4).
28.
Put clean oil on the control plate. Position the control
plate on the end of the rotating group.
29.
Align dowel pin (13) in rear cover plate (4g with the
single hole in the control plate. Put the rear cover plate
in position on housing (2), and install six bolts (5).
Tighten the bolts to a torque of 86 N m (64 lb-ft).
30.
Assemble flushing valve (8) using the following
procedure.
a.
Install O-ring seal (30) on plug (31).
b.
Install spoon (27), guide (28), spring (29) and plug
(31) in valve body (26).
c.
Install O-ring seal (16) on plug (15).
d.
Install guide (22), spring (17) and plug (15) in the
valve body.
e.
Install orifice (23) in piston valve (21), and install
retaining ring (24).
f.
Install O-ring seal (119) on plug (18).
g.
Install piston valve (21), spring (20) and plug (18), in
valve body (26).
h.
Install three O-ring seals (25) in valve body (26).
31.
Position flushing valve (8) on the rear cover plate, and
install five bolts (14).
End By:
a.
install vibrator motor
14-124