TM 5-3895-383-24
Illustration 71
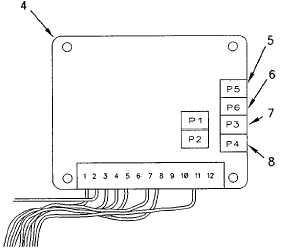
Variable Frequency Controller
(4) Variable frequency controller. (5) “P5" Low amplitude-
minimum frequency potentiometer. (6) "P6” High amplitude-
minimum frequency potentiometer. (7) “P3” Low amplitude-
maximum frequency potentiometer. (8) "P4” High amplitude-
maximum frequency potentiometer.
10.
If the nominal amperage that is measured for high
amplitude-minimum
frequency
is
not
450
mA,
potentiometer (6) must be adjusted. Depress the
vibratory on/off control switch (2) in order to stop current
flow to the vibratory system.
11.
Keep vibratory amplitude control (3) in the HIGH
AMPLITUDE position.
12.
Turn vibratory control dial (1) to the full clockwise
position (maximum frequency).
13.
Depress vibratory on/off control switch (2) in order to
supply current to the vibratory system.
14.
The nominal amperage that is measured for high
amplitude-maximum frequency is 520 mA.
15.
If the nominal amperage that is measured for high
amplitude-maximum frequency is not 520 mA, adjust
potentiometer (8). Depress the vibratory on/off control
switch (2) in older to stop current flow to the vibratory
system.
NOTE:
After the nominal amperage for the high
amplitude-maximum
frequency
has
been
adjusted, repeat Steps 6 through 10 in order to
verify that the nominal amperage for the high
amplitude-minimum frequency has not changed.
16.
Place vibratory amplitude control (3) in the LOW
AMPLITUDE position.
17.
Connect the 6V-7070 Digital Multimeter to item 1 on the
fabricated wiring harness so that the amperage value to
the low amplitude solenoid may be measured.
18.
Turn
vibratory
control
dial
(1)
to
the
full
counterclockwise position (minimum frequency).
19.
Depress vibratory on/off control switch (2) in order to
supply current to the vibratory system.
20.
The nominal amperage that is measured for low
amplitude-minimum frequency is 450 mA.
21.
If the nominal amperage that is measured for low
amplitude-minimum frequency is not 450 mA, adjust
potentiometer (5). Depress the vibratory on/off control
switch (2) in order to stop current flow to the vibratory
system.
22.
Keep the vibratory amplitude control (3) in the LOW
AMPLITUDE position.
23.
Turn vibratory control dial (1) to the full clockwise
position (maximum frequency).
24.
Depress vibratory on/off control switch (2) in order to
supply current to the vibratory system.
25.
The nominal amperage that is measured for low
amplitude-maximum frequency is 520 mA.
26.
If the nominal amperage that is measured for low
amplitude-maximum frequency is not 520 mA, adjust
potentiometer (7). Depress the vibratory ON/OFF
control switch (2) in order to stop current flow to the
vibratory system.
NOTE:
After the nominal amperage for the low amplitude-
maximum frequency has been adjusted, repeat
Steps 16 through 21 in order to verify that the
nominal amperage for the low amplitude-minimum
frequency has not changed.
NOTE:
After the nominal amperages for the low
amplitude maximum frequency and low amplitude
minimum frequency have been adjusted, repeat
Steps 6 through 15 in order to verify that the
nominal amperages for the high amplitude-
maximum frequency and high amplitude-minimum
frequency have not changed.
NOTE:
After you perform this procedure, perform the
Variable Frequency - Test procedure in order to
make sure that the vibratory frequencies are
correct.
11-62