
1
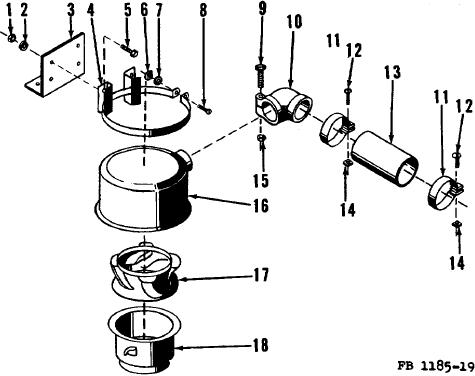
Nuts, hex, %-16 NC (4 req'd)
10
Clamping elbow
2
Washers, lock, std, % (4 req'd)
11
Hose clamps (2 req'd)
3
Mounting bracket
12
Hose clamp screws (2 req'd)
4
Saddle bracket
13
Hose
5
Screws, hex hd, %-16 NC x %
14
Hose clamp screw nuts (2 req'd)
(4 req'd)
15
Clamping bolt nut
6
Nut, square, %-16 NC
16
Air cleaner body
7
Washer, lock, std, %
17
Vortex chamber
8
Screw, rd hd, %-16 NC x 1%
18
Air cleaner cup
9
Clamping bolt
Figure 19. Air cleaner disassembled.
(3) Install the air cleaner cup (18) on the bottom part of the air cleaner body (16). Turn the cup clockwise to
engage the latches. Fill the cup with oil. Refer to LO 5-1185.
(4) Install the hose (13) and hose clamps (11) on the clamping elbow (10) and tighten the hose clamp screw
(12).
(5) Connect the hose (13) with the air cleaner body (16) and tighten the hose clamp screw (12) securely.
f. Installation.
(1) Install the air cleaner on the carburetor and tighten the clamping bolt (9).
(2) Aline the saddle bracket (4) with the air cleaner mounting bracket (3) and install the mounting screws (5),
lockwashers (2), and nuts (1).
(3) Tighten all mounting screws securely. Start the engine and check the air cleaner for proper operation.
76