TM 5-3895-382-24
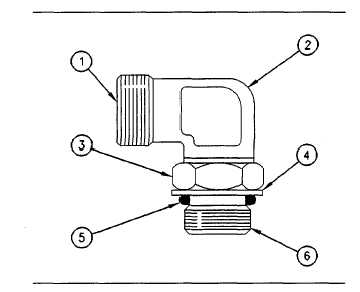
Illustration 3
Elbow body assembly
(1) End of the fitting body that connects to the tube. (2) Fitting body.
(3) Locknut. (4) Backup washer. (5) O-ring seal. (6) End the fitting
that goes into the other part.
1.
Put locknut (3), backup washer (4) and O-ring seal (5)
as far back on fitting body (2) as possible. Hold these
components in this position. Turn the fitting into the part
that is used for the fitting. Turn the fitting until backup
washer (4) contacts the surface of the part that is used
for backup washer (4).
2.
To put the fitting assembly in the correct position, turn
fitting body (2) outward to a maximum of 360 degrees.
Tighten locknut (3) to the torque that is shown in the
correct chart for the fitting that is used.
NOTE: If the fitting is a connector
(straight fitting), the hex on the
body takes the place of the
locknut. To install this type of
fitting, tighten the hex against the
face of the part for the hex.
Torques for Flared and O-Ring Fittings
SMCS Code: 7553
The torques that are shown in Table 7 and in Table 8 should
be used on the nut of the following fittings: 37 degree flared
fittings, 45 degree flared fittings, inverted flared fittings, O-ring
plugs for a recessed drive, O-ring fittings for the air
conditioning, and swivel nuts. The torques should be used for
applications that allow the following working pressures: 7750 to
34,450 kPa (1125 to 5000 psi). The torque depends on the
size of the fitting and the type of the fitting.
37 Degree Flared Fittings
Illustration 4
(1) 37 degree flared fitting. (2) Swivel nuts.
4-7


