
Section III. TROUBLESHOOTING
by a list of probable causes. The corrective action
4-4. General
This section provides information useful in diagnosing and
recommended is described opposite the probable cause.
4-5. Engine Malfunction
correcting unsatisfactory operation or failure of the roller
If engine malfunctions refer to TM 5-2805-258-14.
and its components. Malfunctions which may occur are
listed in Table 4-2. Each malfunction stated is followed
Section IV. RADIO INTERFERENCE SUPPRESSION
Refer to TM 5-2805-258-12 for instructions on radio
interference suppression on the gasoline engine.
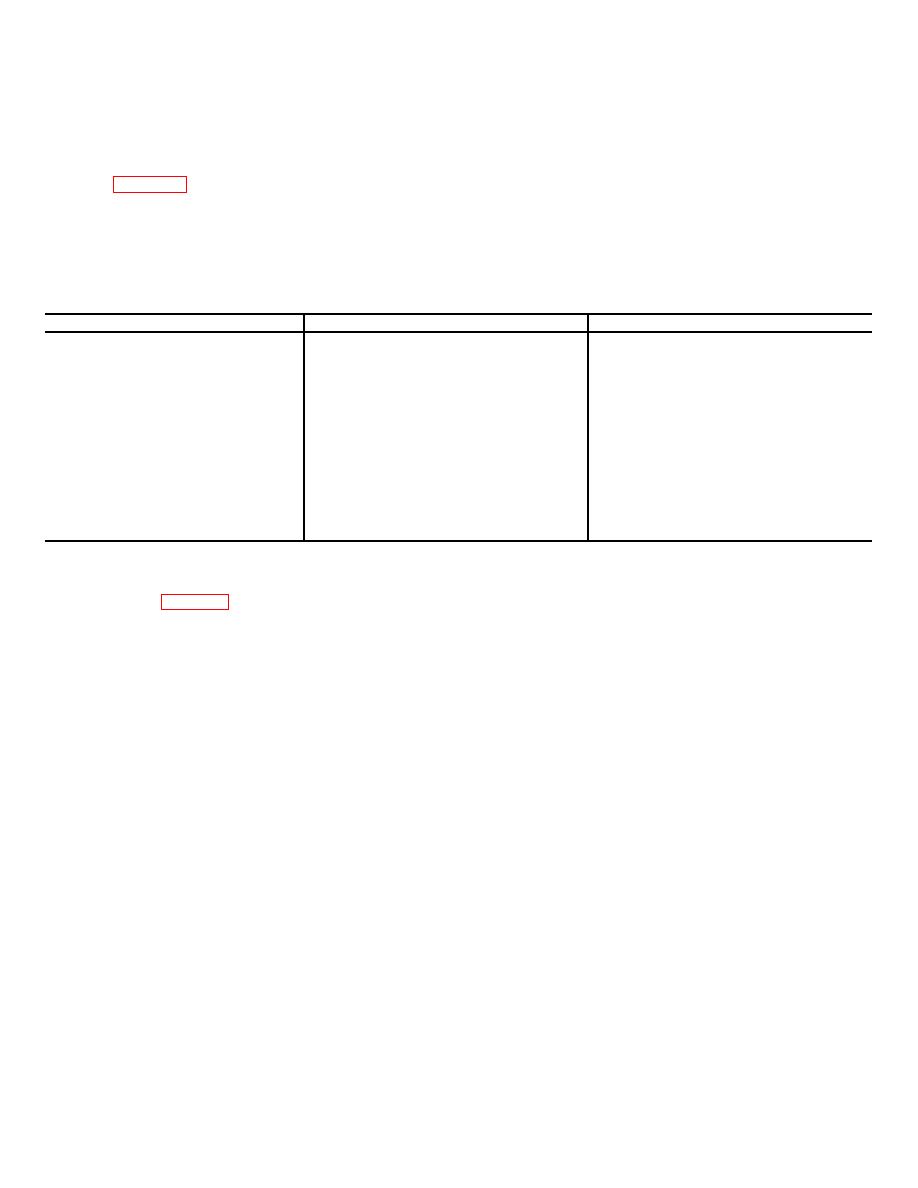
Table 4-2. Troubleshooting
Malfunction
Probable Cause
Corrective Action
1. Engine fails to start.
a. Lack of fuel.
a. Fill fuel tank.
b. Low battery charge.
b. Recharge or replace battery.
c. Broken battery cable.
c. Replace cable.
d. Dirty or loose battery cable
d. Clean and tighten battery cable
connections.
connections.
e. Dirty fuel strainer
e. Clean or replace strainer.
2. Clutch runs hot.
Shaft bearings are dry.
Lube per latest lubrication order.
3. Vibrator shaft not turning at
a. Belt loose.
a. Tighten bell
proper RPM.
b. Engine not running at proper
b. Ref. TM 5-2805-258-14.
speed.
4. Vibrator shaft does not turn.
a. Shaft bearings seized to shaft.
a. Report to general support
b. Clutch slipping.
b. Report to general support
Section V. ELECTRICAL SYSTEM
KEY TO FIGURE 4-1:
4-6. Batteries (fig. 4-11
1 Bolt
16 Grommet
a. Removal
2 Cable, Jumper
17 Nut
(1) Loosen terminal connector bolts (1) and remove
3 Bolt
18 Washer
jumper cable (2).
4 Nut
19 Bolt
(2) Loosen terminal connector bolt (3), remove nut
5 Washer
20 Hold-Down
(41, washer (5), bolt (6), and remove ground cable (7).
6 Bolt
21 Battery
(3) Loosen terminal connector bolt (8), nut (9),
7 Cable, Ground
22 Nut
washer (10), bolt (11), clamp (12), nut (13), and remove
8 Bolt
23 Washer
battery cable (14) by feeding it through hole il5) after
9 Nut
24 Nut
dislodging grommet (16).
10 Washer
25 Flex Bolt
(4) Remove nut (17), washer (18), holddown bolt
11 Bolt
26 Tray, Battery
(19), and holddown (20). Lift out batteries (21).
12 Clump
27 Nut
(5) Remove nuts (22), washers (23), nuts (24), flex
13 Nut
28 Screw
bolt (25), and lift-out battery tray (26).
14 Cable, Battery
29 Hasp
(6) Remove nuts (27), screws (28) and remove
15 Hole
30 Box, Battery
hasps (29) from battery box (30).
b. Installation. Installation is in the reverse of removal.
4-2

