
Trouble Shooting
DETROIT DIESEL
2.
Stop the engine and remove the fuel pipes from the No. I injector and the fuel connectors.
3.
Remove the injector and install adaptor J 7915-02 and pressure gage and hose assembly J 6992 (Fig. 1).
4.
Use a spare fuel pipe and fabricate a jumper connection between the fuel 'inlet and return fuel connectors to permit
fuel
to flow directly to the fuel return manifold.
5.
Start the engine and run it at 600 rpm. Observe and record the compression pressure indicated on the gage.
NOTE: Do not crank the engine with the starting motor to check the compression
pressure.
6. Perform Steps 2 through 5 on each cylinder. The compression pressure in any one cylinder should not be less than
430 psi (540 psi for "N" engines) at 600 rpm. In addition, the variation in compression pressures between cylinders of the
engine must not exceed 25 psi at 600 rpm.
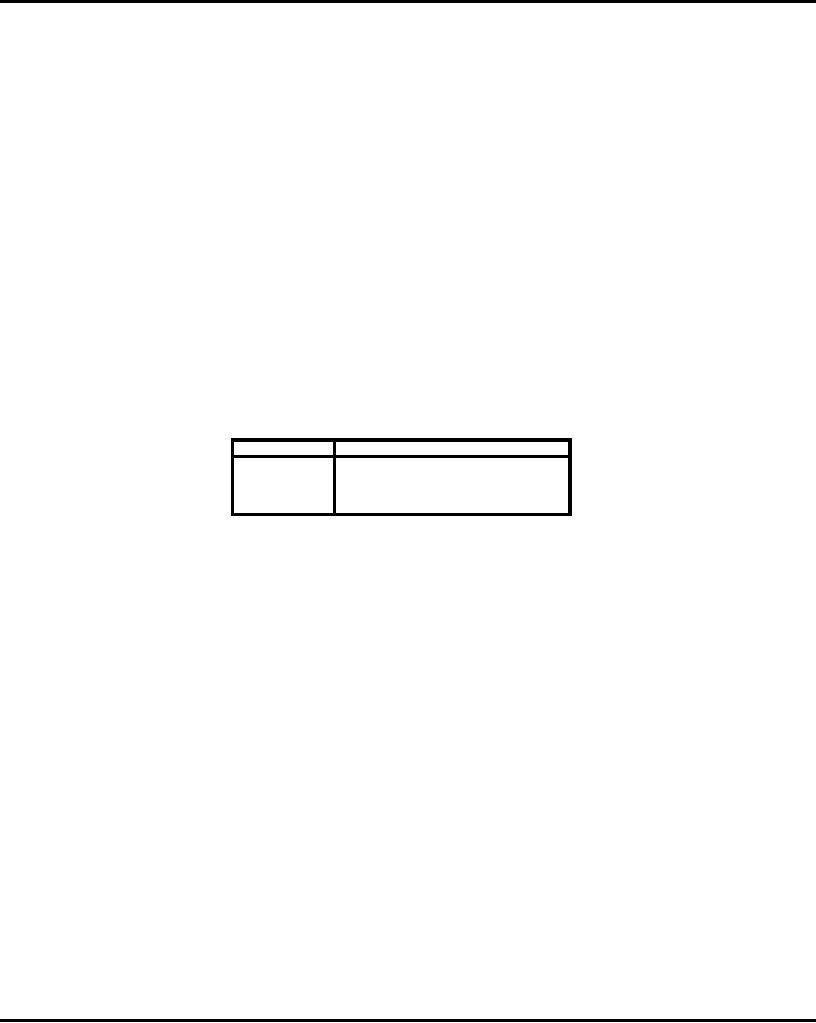
EXAMPLE: If the compression pressure readings were as shown in Table 2, it
would be evident that No. 3 cylinder should be examined and the cause of the low
compression pressure be determined and corrected.
Note that all of the cylinder pressures are above the low limit for satisfactory engine operation. Nevertheless, the No. 3
cylinder compression pressure indicates that something unusual has occurred and that a localized pressure leak has
developed.
Low compression pressure may result from any one of several causes:
A. Piston rings may be stuck or broken. To determine the condition of the rings, remove the air box cover and press on
the compression rings with a blunt tool. A broken or stuck compression ring will not have a "spring-like" action.
B. Compression pressure may be leaking past the cylinder head gasket, valve seats, injector tubes or through a hole in
the piston.
Cylinder
Gage Reading*
1
525 psi (3617 kPa)
2
520 psi (3583 kPa)
3
485 psi (3342 kPa)
4
515 psi (3548 kPa)
*The above pressures are for an engine operating at an altitude near sea level.
TABLE 2
Engine Out of Fuel
The problem in restarting the engine after it has run out of fuel stems from the fact that after the fuel is exhausted from
the fuel tank, fuel is then pumped from the primary fuel strainer and sometimes partially removed from the secondary
fuel filter before the fuel supply becomes insufficient to sustain engine firing. Consequently, these components must be
refilled with fuel and the fuel pipes rid of air in order for the system to provide adequate fuel for the injectors.
When an engine has run out of fuel, there is a definite procedure to follow for restarting it. The procedure is outlined
below:
1. Fill the fuel tank with the recommended grade of fuel oil. If only partial filling of the tank is possible, add a minimum
of ten gallons of fuel.
2. Remove the fuel strainer shell and element from the strainer cover and fill the shell with fuel oil. Install the shell and
element.
3. Remove and fill the fuel filter shell and element with fuel oil as in Step 2.
4. Start the engine. Check the filter and strainer for leaks.
NOTE: In some instances, it may be necessary to remove a valve rocker cover
and loosen a fuel pipe nut in order to bleed trapped air from the fuel system. Be
sure the fuel pipe is retightened securely before replacing the rocker cover.
Primer J 5956 may be used to prime the engine fuel system. Remove the filler plug in the fuel filter cover and install the
primer. Prime the system. Remove the primer and install the filler plug.
Fuel Flow Test
1. Disconnect the fuel return hose from the fitting at the fuel tank and hold the open end in a suitable container.
2. Start and run the engine at 1200 rpm and measure the fuel flow for a period of one minute. At least .6 gallon of fuel
should flow from the fuel return hose per minute.
3. Immerse the end of the fuel return hose in the fuel in the container. Air bubbles rising to the surface of the
Page 114