TM 5-3895-383-24
1.
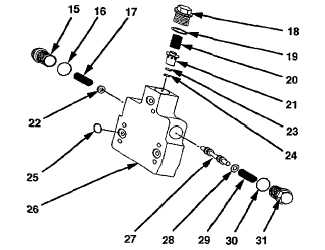
Remove five bolts (14), and remove flushing valve (8)
from rear cover plate (4).
2.
Disassemble flushing valve (8) using the following
procedure.
a.
Remove three O-ring sea (25) from valve body (26).
Check the O-ring seals for wear or damage and
replace if necessary.
b.
Remove plug (18), spring (20) and piston valve (21)
from valve body (26).
c.
Remove O-ring seal (19) from plug (18). Check the
O-ring seal for wear or damage and replace if
necessary.
d.
Remove retaining ring (24), and remove orifice (23)
from piston valve (21).
e.
Remove plug (15), spring (17) and guide (22) from the
valve body.
f.
Remove O-ring seal (16) from plug (15). Check the
O-ring seal for wear or damage and replace if
necessary.
g.
Remove plug (31), spring (29), guide (28) and spool
(27) from valve body (26).
h.
Remove O-ring seal (30) from plug (31). Check the
O-ring seal for wear or damage and replace if
necessary.
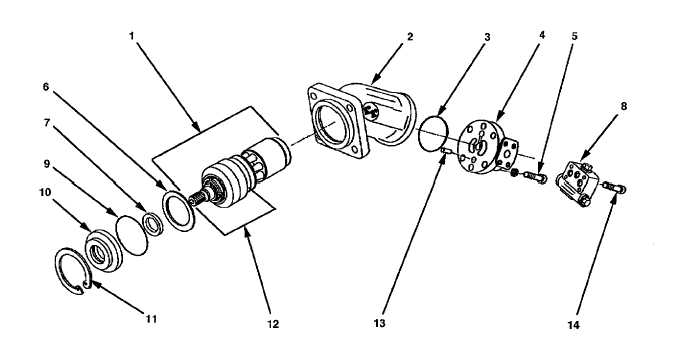
3.
Put tape around the splined drive shaft to prevent
damage to the drive shaft or seals during disassembly
of the vibratory motor.
4.
Tap front cover (10) with a plastic hammer to release
some of the pressure against retaining ring (11). Use
Tool (A) to remove retaining ring (11) from housing (2).
5.
Remove front cover (10), O-ring seal (9) and shim (6)
from housing (2), Check the O-ring seal for wear or
damage and replace if necessary.
6.
If necessary, remove lip-type seal (7) from front cover
(10). The lip-type seal must be replaced with a new
seal if it is removed from the front cover.
14-122